
Letting users print coupons the easy way

The goal is to present numerous coupons to the user, who can then freely select which ones they’re interested in and easily print them.
Requirements
- Simple and intuitive user interface
- Print-out will only contain selected coupons
Solution
We decided to stack all of the coupons, so they could be scrolled through without having to click anything or opening a new window. Each coupon is preceded with a checkbox and the user can click on the checkbox or the coupon itself to mark it for print. Below the coupons is a print button, which uses a specially crafted print stylesheet to strip the entire website and only print the selected coupons.
Implementation
The structure of our XHTML document looks as follows:
<div id="lookbook">
  <p><a href="#" class="select">Select All</a> / <a href="#" class="deselect">Deselect All</a></p>
  <div class="coupons">
    <ul>
      <li>
        <div class="check"></div>
        <div class="coupon">
          <img src="COUPONS.jpg" alt="Coupon 1" height="175" width="690" />
        </div>
      </li>
      <li>
        <div class="check"></div>
        <div class="coupon">
          <img src="COUPONS2.jpg" alt="Coupon 2" height="175" width="690" />
        </div>
      </li>
      <li>
        <div class="check"></div>
        <div class="coupon">
          <img src="COUPONS3.jpg" alt="Coupon 3" height="175" width="690" />
        </div>
      </li>
    </ul>
  </div>
  <div class="button"><div class="print">Print Selected Coupons</div></div>
</div>
The relevant CSS is below:
#lookbook .coupons ul {
    list-style: none;
    margin: 0;
    padding: 0;
    }

#lookbook .coupons ul li {
    cursor: pointer;
    display: block;
    margin-bottom: 25px;
    position: relative;
    height: 175px;
    width: 778px;
    }

#lookbook .coupons ul li .coupon {
    border: 2px dashed #ccc;
    padding: 5px;
    position: absolute;
    right: 0;
    height: 175px;
    width: 690px;
    }

#lookbook .coupons ul li:hover .coupon {
    border-color: #666;
    }

#lookbook .coupons ul li .check {
    background-image: url('checksprite.png');
    background-position: 0 0;
    background-repeat: no-repeat;
    position: absolute;
    top: 50px;
    left: 0;
    height: 70px;
    width: 70px;
    }

#lookbook .coupons ul li:hover .check {
    background-position: -100px 0;
    }

#lookbook .coupons ul li.print .check {
  background-position: -200px 0;
}

#lookbook .button .print {
  background-color: #ED1C24;
  border: 1px solid #333;
  border-radius: 5px;
  box-shadow: 2px 2px 3px #999, inset 1px 1px #fff;
  color: #fff;
  cursor: pointer;
  font-size: 1.2em;
  font-weight: bold;
  margin: 0 auto;
  padding: 10px;
  text-align: center;
  text-shadow: 0 1px 0 #000;
  width: 250px;
}

#lookbook .button .print:hover {
  background-color: #D11920;
  border-color: #000;
}

@media print {

  #sitesearch, #eyebrow, #navigation-layer, #branding-layer, .leaderboard, #breadcrumb-layer, #column-3, #footer,
  #lookbook .header, #lookbook .intro, #lookbook .help, #lookbook .sel-links, #lookbook .coupons ul li .check, #lookbook .button {
    display: none;
  }

  #page-body {
    overflow: visible !important;
  }

  #lookbook .coupons {
    position: absolute;
    top: 0;
    left: 0;
  }

  #lookbook .coupons ul li {
    display: none;
  }

  #lookbook .coupons ul li.print {
    display: block;
  }

  #lookbook .coupons ul li .coupon {
    position: relative;
  }
}
Here are a few things of importance in our CSS:
- On line 30 we reference a single image called checksprite.png, which contains the three states of our checkbox: an empty checkbox, a checkbox while the mouse is hovering over it, and a selected checkbox.
- On line 69 we declare an internal stylesheet that will be called upon when a user prints our page.
- On line 71 we exclude elements from our site by hiding them (
display="none"), so that we really only get the coupons on the print-out, not the site header, navigation, etc.
Last, but not least, here’s the jQuery:
Event.observe(window, 'load', function() {
  jQuery('#lookbook li').click(function(){
    jQuery(this).toggleClass('print');
  });
  jQuery('#lookbook .select').click(function(e){
    jQuery('#lookbook li').removeClass('print');
    jQuery('#lookbook li').addClass('print');
    e.preventDefault();
  });
  jQuery('#lookbook .deselect').click(function(e){
    jQuery('#lookbook li').removeClass('print');
    e.preventDefault();
  });
  jQuery('#lookbook .print').click(function(e){
    window.print();
  });
});
I should note that the page this code was written for primarily uses prototype, which means our jQuery is running in no conflict mode. This is why we didn’t use the normal $ to reference jQuery functions and that’s also why we’re using Event.observe to load our code.
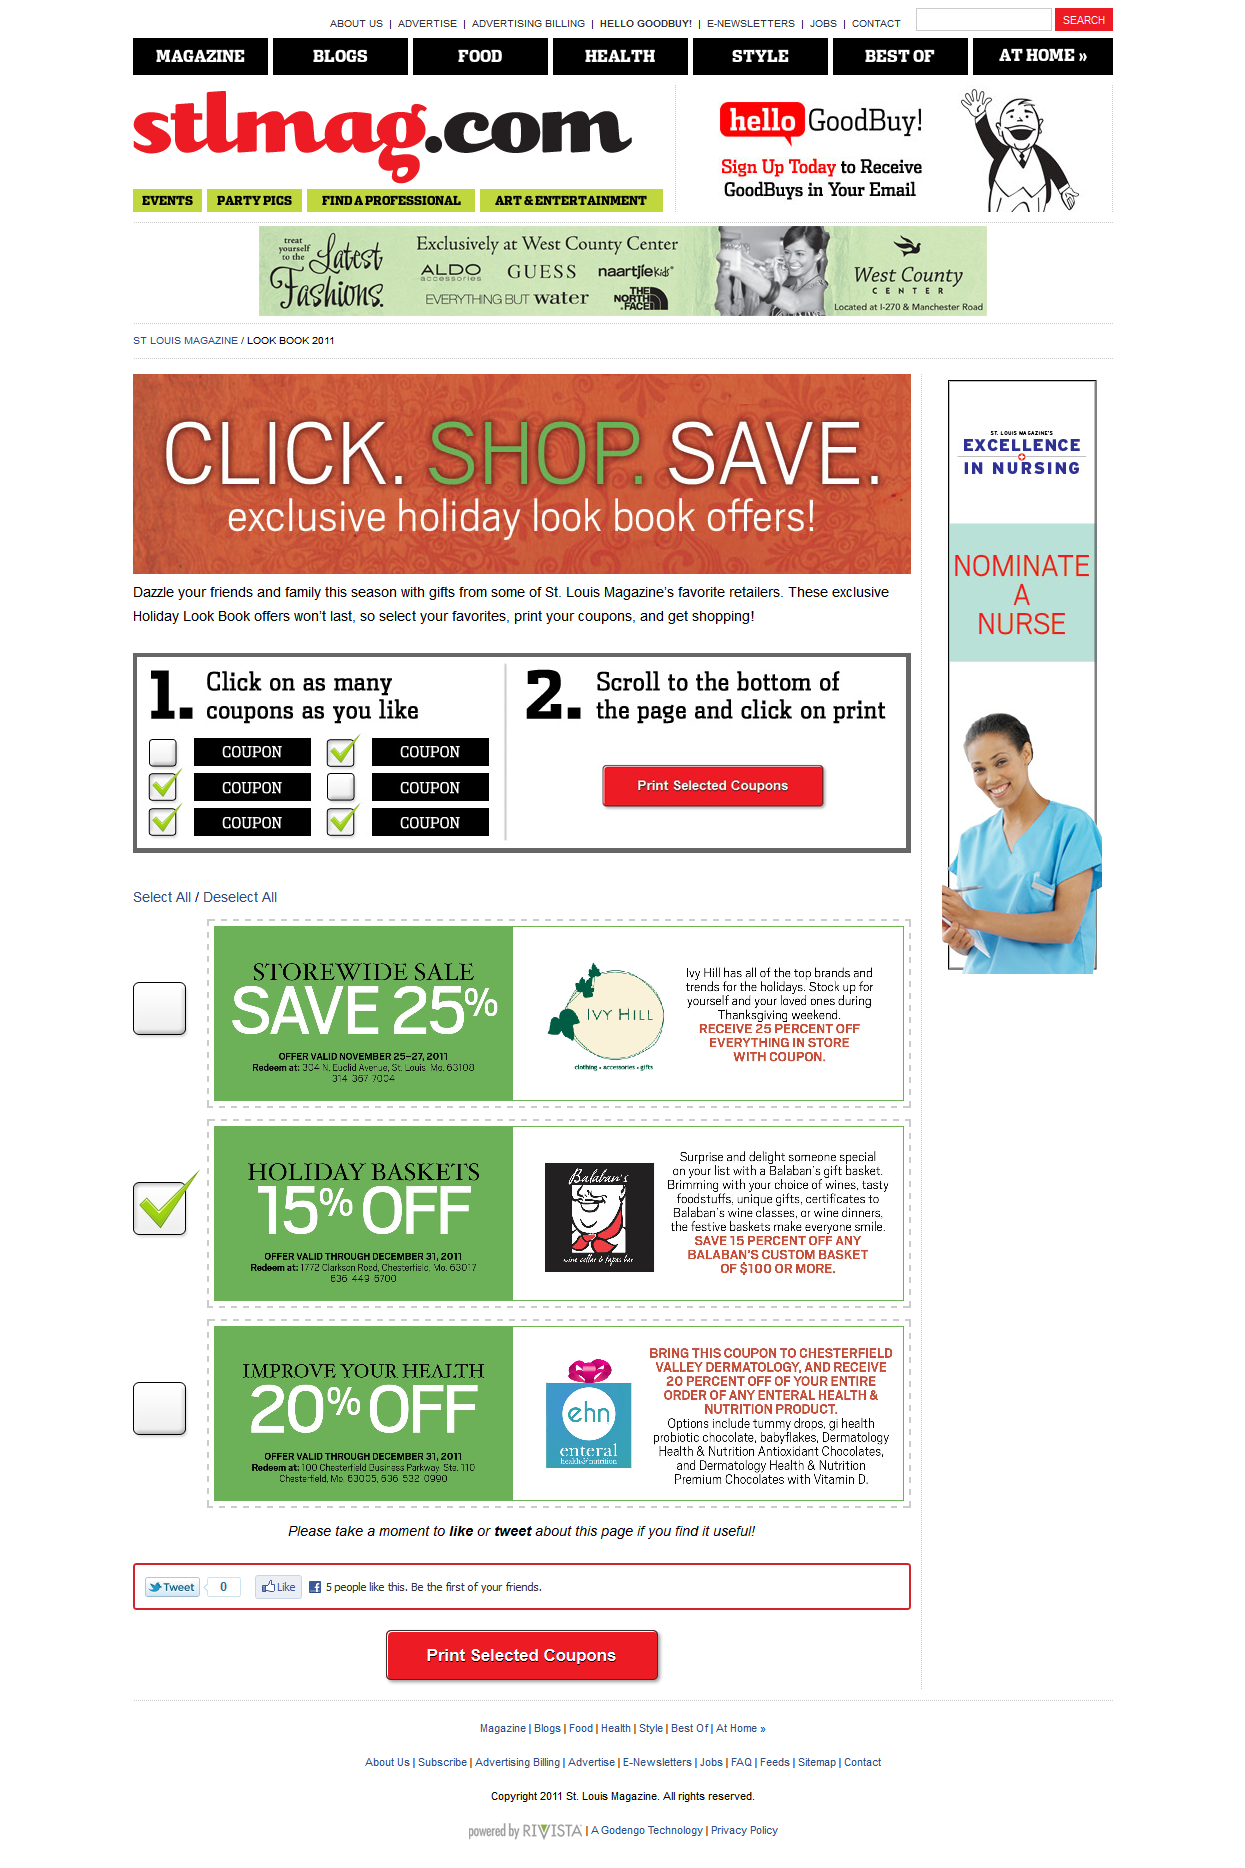
Result
We’re displaying a list of coupons in an unordered list. jQuery is listening for the user to click on any one of the coupons, and upon the user doing so, it adds a CSS class to that coupon, which is how the print stylesheet knows which coupons to hide and which ones to show.
This project has been implemented on St. Louis Magazine’s Look Book page, but below is a screenshot of the result as well:
If you have any questions or comments, feel free to leave them below.
June 13, 2013 Update: Here is a jsFiddle demo and the corresponding code.
December 28, 2013 Update: If you are having trouble with the jQuery code, it’s probably because you’re missing the function that checks to ensure the document is ready before running any code. Here is an example:
jQuery(document).ready(function($){
  $('#lookbook li').click(function(){
    $(this).toggleClass('print');
  });
  $('#lookbook .select').click(function(e){
    $('#lookbook li').removeClass('print');
    $('#lookbook li').addClass('print');
    e.preventDefault();
  });
  $('#lookbook .deselect').click(function(e){
    $('#lookbook li').removeClass('print');
    e.preventDefault();
  });
  $('#lookbook .print').click(function(e){
    window.print();
  });
});
Featured image by Perry Merrity II.
Comments (2)
Previously posted in WordPress and transferred to Ghost.
Karmendra
March 31, 2012 at 5:15 am
Hi Ryan, Thanks for the code and all. I’m trying to build page of my website where visitors can print coupons.
I used your html and css codes but i don’t know where to place the jquery code.
Any help will be appreciated
Ryan
March 31, 2012 at 12:50 pm
Have you used jQuery before? If not, first you need to download and include the library: jquery.com. Then you can take the jQuery code on this page, place it in its own file (e.g. coupons.js), and include it after you include the jQuery library.